Remote access to your Raspberry Pi is crucial to simplify management without the need for a physical screen, keyboard, or mouse. Configuring SSH (Secure Shell) access is a crucial step in establishing a secure connection with your Raspberry Pi.
Similar to the Wi-Fi configuration, you can configure some important elements of the SSH server even before the first boot of the Raspberry using the Raspberry Pi Imager utility.
openssh-server
Before you begin, ensure that your Raspberry Pi is equipped with a compatible operating system. Commonly used systems like Raspbian support SSH right from the installation. Also, make sure your Raspberry Pi is connected to your local network. You can check the proper functioning of the SSH server on your Raspberry with the following command:
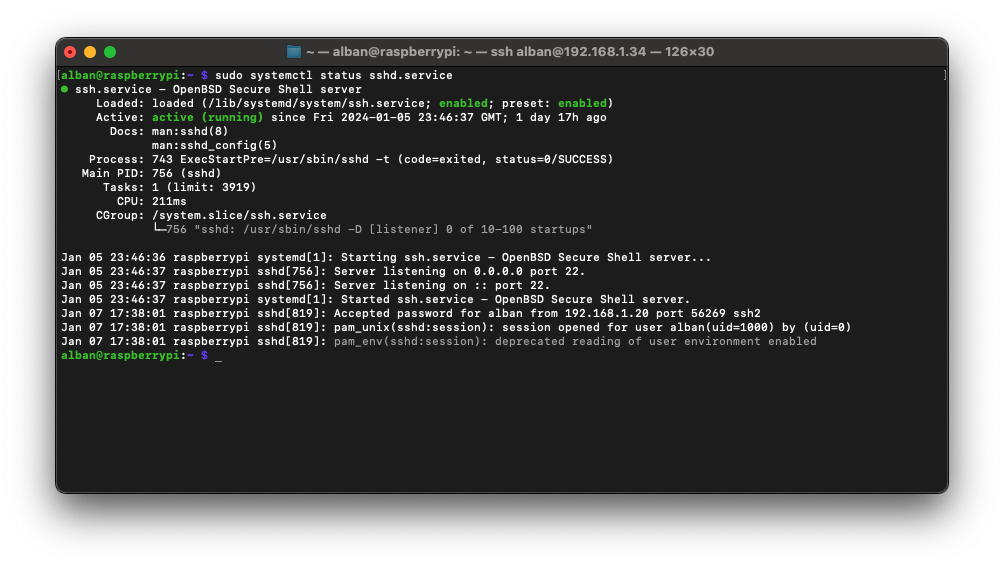
sudo systemctl status sshd.service
If the SSH server is working correctly, the response to this command should look like this:
 If the command returns an error like:
 Unit sshd.service could not be found., it is necessary to install the SSH server. The following commands can help you with that:
sudo apt update
sudo apt upgrade
sudo apt install openssh-server
SSH Activation
The easiest way to enable the SSH service is to use the raspi-config tool from the Raspberry Foundation. To do this, follow these steps:
- Open a terminal on your Raspberry Pi.
- Type the following command to open the configuration tool:
sudo raspi-config - Select the Interface Options option.
- Navigate to SSH and press Enter.
- Choose Yes to enable the SSH service.
- Press Finish to exit the configuration tool.
For the next steps, you need to know the IP address of the Raspberry on your network. You can use the interface of your network router or the following command on the Raspberry:
hostname -I | awk '{print $1}'
SSH Connection from Another Device
Once the SSH service is enabled, you can connect to your Raspberry Pi from another computer on the same network. Use the IP address of your Raspberry Pi to establish the SSH connection. The standard command is as follows (replace address_ip with the actual address):
ssh pi@address_ip
You will be prompted to enter the default password, which is usually raspberry for the pi user.
Changing the Default Password
It is highly recommended to change the default password of your Raspberry Pi to enhance security. Use the following command to change the password for the pi user:
passwd
Follow the instructions to set a strong new password.
Advanced Configuration
For security measures, you can make some additional modifications.
Use of SSH Keys
Using an SSH key on your Raspberry Pi is an excellent practice to secure remote access to your device. This eliminates the need to enter a password every time you connect via SSH, while enhancing the security of your connection.
Key Pair Generation
On Your Computer:
- Use the following command to generate a key pair:
ssh-keygen -t rsa
- Follow the on-screen instructions. Simply press
Enterto accept the default settings unless you want to specify a different location or filename.
Copy the Public Key to the Raspberry Pi:
- Use the following command to copy the public key to your Raspberry Pi (replace
piandaddress_ipwith your username and the IP address of your Raspberry Pi):
ssh-copy-id pi@address_ip
- You will be prompted to enter the password for your Raspberry Pi.
SSH Connection with the Key
Now you should be able to connect to your Raspberry Pi without being prompted for a password:
ssh pi@raspberrypi
You should be connected without entering a password.
Disabling Password Authentication (Optional):
To enhance security, you can disable password authentication on your Raspberry Pi. Edit the SSH configuration file:
sudo nano /etc/ssh/sshd_config
Change PasswordAuthentication yes to PasswordAuthentication no, then restart the SSH service:
sudo systemctl restart sshd.service
Changing the SSH Port
The default SSH port on all servers is port 22. Changing this port makes automated attacks more difficult. To make this change, edit the /etc/ssh/sshd_config file with administrator rights:
sudo nano /etc/ssh/sshd_config
You can then remove the # on the line #Port 22 and change the value 22 to the port of your choice between 1024 and 65536. Save and exit nano with the keyboard shortcuts: ctrl+o, ctrl+x.
Next, you need to restart openssh-server to apply the changes:
sudo systemctl restart sshd.service
Connecting to your Raspberry will be done with a new parameter to specify the connection port (replace pi with your username, address_ip with the actual IP address, and port_de_connexion with the new port):
ssh pi@address_ip -p port_de_connexion
Configuring SSH on your Raspberry Pi is an essential step to ensure secure remote access. By following these simple steps, you enhance the management of your Raspberry Pi while reinforcing the security of your system. Feel free to explore advanced options to further customize your SSH configuration based on your specific needs.

